Showing posts with label TheVisibleAndTheInvisible. Show all posts

1114 - recontextualization and electric signals - 001

I did some experiments using the 3d object from this video and metaballs node in vvvv.

/ 기존에 만들었던 영상에서 추출한 형태를 사용하여 vvvv의 metaballs 노드와 함께 몇 가지 실험을 해보았다. /

-----------------------------------------------------------------------------------------------------------
1 /
-----------------------------------------------------------------------------------------------------------

I blended 2 objects based on the same data in a single screen.

/ 동일한 데이터를 기반으로 하는 두가지 형태를 하나의 화면에 보일 수 있도록 겹쳐서 나타냈다. /

vvvv - recontextualization - 001 - 1114_recontextualization_001.v4p - 20131114

1114_recontextualization_001.v4p - 20131114

-----------------------------------------------------------------------------------------------------------
2 /
-----------------------------------------------------------------------------------------------------------

And I turned metaballs into lower resolution ones to add the backslash pattern into them. You can check grid sizes of metaballs are changing by fps values in the video below.

/ 그리고 이전에 사용했던 패턴을 적용하면서, 패턴이 더 잘 보일 수 있도록 metaball 폴리곤의 해상도를 낮추었다. 아래의 영상에서 metaball의 grid size가 fps 데이터에 영향을 받아 형태를 변화하는 것을 확인할 수 있다. /

1114_recontextualization_002.v4p - 20131114

1114_recontextualization_004.v4p - 20131115

vvvv - recontextualization - 004 - 1114_recontextualization_004.v4p - 20131115

_ grid size of metaballs ∝ fps


1111 - develop

I added CPU value from my computer.


vvvv + kinect - 1110_metaballs_002.v4p - 20131111

vvvv + kinect - 1110_metaballs_002.v4p - 20131111


1107 - metaballs

From my another work which is about human motion as graphic and sound in Hongik media art class (link), I thought it would be better to use metaballs (link - research) for demonstrating the systematic and organic connection among different objects.

This way can be applied and helpful to developing this thesis work. Motions from human and environment in reality, and the other motions from computer signals can be linked by metaballs, and show their organic and systematic connections.

홍익대 미디어 아트 수업 (link)에서 사람의 움직임을 그래픽과 소리로 표현하는 작업을 하면서, 움직임을 지닌 개체 간의 연결을 좀 더 유기적으로 표현하기 위해 metaballs (link - research)를 사용하는 것이 좋을 것 같다는 생각이 들었다.

이 방법은 이 논문 작업에도 도움이 될 것이라 생각하는데, 실제로 존재하는 사람과 환경에서의 움직임, 그리고 컴퓨터 내에 존재하는 신호에 의한 움직임을 metaballs의 개념으로 연결하여, 유기적인 연결과 움직임을 보여줄 것이다.

hongik media art class work - n-dimensional motion + sound - 014

hongik media art class work - n-dimensional motion + sound - 016

-----------------------------------------------------------------------------------------------------------
1 / original patch
-----------------------------------------------------------------------------------------------------------

original vvvv patch - Metaballs (EX9.Geometry) help.v4p

-----------------------------------------------------------------------------------------------------------
2 / control metaballs
-----------------------------------------------------------------------------------------------------------

screen capture in vvvv - 1107_metaballs_001.v4p - 20131107

vvvv + kinect - 1107_metaballs_001.v4p - 20131107

+
움직임을 부드럽게 하기 위해서 delay와 deniro 노드를 사용해야겠다.


1028 - develop

I developed the previous works.

screen capture in vvvv - 1020_kinect_005.v4p - 20131020

-----------------------------------------------------------------------------------------------------------

And I changed the anaglyph patch based on another anaglyph patch (link - research blog) from the same page. (link)

screen captures in vvvv - 1028_anaglyph.v4p - 20131028

screen capture in vvvv - 1028_kinect_006.v4p - 20131028

Actually, there were some problems to combine skeleton and environment wireframe. So I will solve them soon.


1019 - vvvv + env + anaglyph

After developing the previous work, I needed to arrange my thought.

지난번의 작업을 좀 더 발전시키고 나서, 생각을 정리할 필요를 느꼈다.

screen capture in vvvv - 1018_kinect_003.v4p - 20131019


note - 20131019 - 001 / 002

And I did some experiments based on the memo above to combine with a kinect patch.

그리고 위의 메모를 바탕으로, 앞으로의 작업에 필요한 몇 가지를 시도해보았다.

-----------------------------------------------------------------------------------------------------------
1 / x file - vertices xyz /
-----------------------------------------------------------------------------------------------------------


screen captures in vvvv - 1019_verticesXYZ.v4p - 20131019

All vertex values were extracted from a x file that I formerly used (link - thesis / media studio blog) , and I added a point into each vertex. Also these vertex values will be useful to draw lines.

+ I think I can make a laser cutting object using the lines and slides in ioboxes above. The output screen and 3 ioboxes are visually different for people, but computer feels like they are totally the same because they have the same values.

예전에 사용했던 x file (link - thesis / media studio blog) 의 vertex 값을 추출해서 각 vertex에 점을 넣었다. 라인을 연결할 때에도 이 vertex 값이 유용하게 쓰일 것이다.

+ 위 그림의 iobox에 있는 라인이나 슬라이드를 취합해서 레이저 커팅을 해도 좋을 것 같다. 사람의 눈으로 봤을 때에는 결과 화면과 나머지 3개의 iobox가 보여주는 것이 모두 다 다르게 보이지만, 같은 수치로부터 추출된 것이기때문에 컴퓨터에게는 모두 다 동일한 한 가지 대상으로 보일 것이다.

-----------------------------------------------------------------------------------------------------------
2 / color channel blend - anaglyph /
-----------------------------------------------------------------------------------------------------------


screen captures in vvvv - 1019_anaglyph.v4p - 20131019

vvvv + anaglyph - 1019_anaglyph.v4p - 20131019

I referred to the original patch (link - research blog) from here (link). I made a difference between 2 x values, and blended 2 renderer nodes. I think I need to check a stereo camera setting in Maya for making this anaglyph effect more detailed.

이 페이지 (link) 에서 받은 원본 패치 (link - research blog)  참고하여 구성하였다. 두 개의 x 좌표에 약간의 차이를 주어 애너글리프 효과를 만들었는데, 마야 프로그램에 있는 스테레오 카메라 설정을 참고하여 더 정교한 효과를 줄 수 있을 것 같다.

-----------------------------------------------------------------------------------------------------------
3 / vvvv 3d object - export to maya /
-----------------------------------------------------------------------------------------------------------

I searched the internet and found there are 2 ways to export 3D file from vvvv.

검색을 통해 vvvv로 만든 3D 오브젝트를 파일로 추출하기 위해 다음과 같은 방법이 있다는 것을 알게 되었다.

_____

1 - the way to export .x file by writer node
2 - the way to combine a mesh information and export .obj file

1 - vvvv에서 writer 노드를 통해 x file로 추출하는 방법
2 - vvvv에서 mesh의 정보를 취합하여 obj 파일로 추출하는 방법

_____

The first way needs to be exported x file from Blender to Maya, and the second way was not working well for some reasons. I will try again.

첫번째 방법에서 x file은 maya에서 직접 열 수가 없기 때문에 blender를 통해 한 번 더 변환을 해야하는 것 같고, 두 번째 방법은 내가 제대로 하지 않은 탓인지 제대로 변환되지 않았다. 다음 번에 다시 시도해봐야겠다.


1017 - vvvv + kinect

I did some experiments using a kinect and basic vvvv patches to make the previous video into realtime.

이전에 만들었던 영상을 리얼타임으로 만들기 위해, 키넥트와 vvvv의 기본 패치를 사용하여 몇 가지 실험을 했다.

original vvvv patch - Kinect (Devices Microsoft) help.v4p
original vvvv patch - Skeleton (Kinect Microsoft) help.v4p

From the original vvvv patches above, I modified them and composed a new patch below.

위의 기본 패치를 수정하고 여러가지 노드를 더하여 다음과 같은 패치를 구성했다.


screen captures in vvvv - 1017_kinect_001.v4p - 20131017

screen capture in vvvv - 1017_kinect_001.v4p - all - 20131017

But I couldn't be satisfied with this patch because all points were connected with fixed lines. So I was thinking how they could be flexible and connected randomly.

하지만 정해진 포인트끼리 선으로 연결하는 것보다 랜덤하게 연결해주는 것이 시각적으로 더 좋을 것 같아서, 랜덤으로 뽑은 값을 선으로 이어줄 수 있는 방법에 대해서 생각해보았다.

note - 20131017

And I modified the patch based on the memo above.

그리고 이를 토대로 패치를 수정하였다.


screen captures in vvvv - 1017_kinect_002.v4p - 20131017

screen capture in vvvv - 1017_kinect_002.v4p - all - 20131017

vvvv + kinect - 1017_kinect_002.v4p - 20131018

Actually, I could have used much fewer nodes to show the output screen above, but I decided not to because it is better to show a concept of my thesis and its beauty from the complex structure.

Next time, I'll find the way to make lines more systematic and flexible. I think if random values are grouped in 3 or 4 parts (or they stop their changing according to specific values), the patch will be much better.

사실 위의 결과 화면을 나타내기 위해 훨씬 더 적은 노드를 사용할 수 있을 것 같았지만, 논문의 주제나 컨셉에는 이런 복잡함이 더 적합하다고 생각하여 의도적으로 복잡하게 나열한 것도 없잖아 있다. 겉으로 간단해보이는 구조에도, 그 내부에는 복잡한 구조에서 느껴지는 아름다움이 존재한다는 것을 보여주고 싶었다.

다음 번에는 선을 좀 더 짜임새있게 연결할 수 있는 방법을 생각해봐야겠다. 랜덤 값을 그룹화하거나 특정 값에 따라서 랜덤 노드가 멈출 수 있게 하면 될 것 같은데 시도해봐야겠다.


1015 - 2 cameras

I proceeded some experiments on the assumption that it is possible to exceed the limitations of dimensions with red, cyan colors of an anaglyph effect and RGB camera, 2 depth sensors of kinect.

키넥트의 RGB 카메라와 2개의 depth 센서, 그리고 애너글리프의 적청 색상을 이용하여 2D는 3D로, 3D는 4D로 표현이 가능할 것이라고 가정하고 작업을 진행하였다.

kinect - 3d depth sensor 1 / rgb camera / 3d depth sensor 2

-----------------------------------------------------------------------------------------------------------
1 ^
-----------------------------------------------------------------------------------------------------------

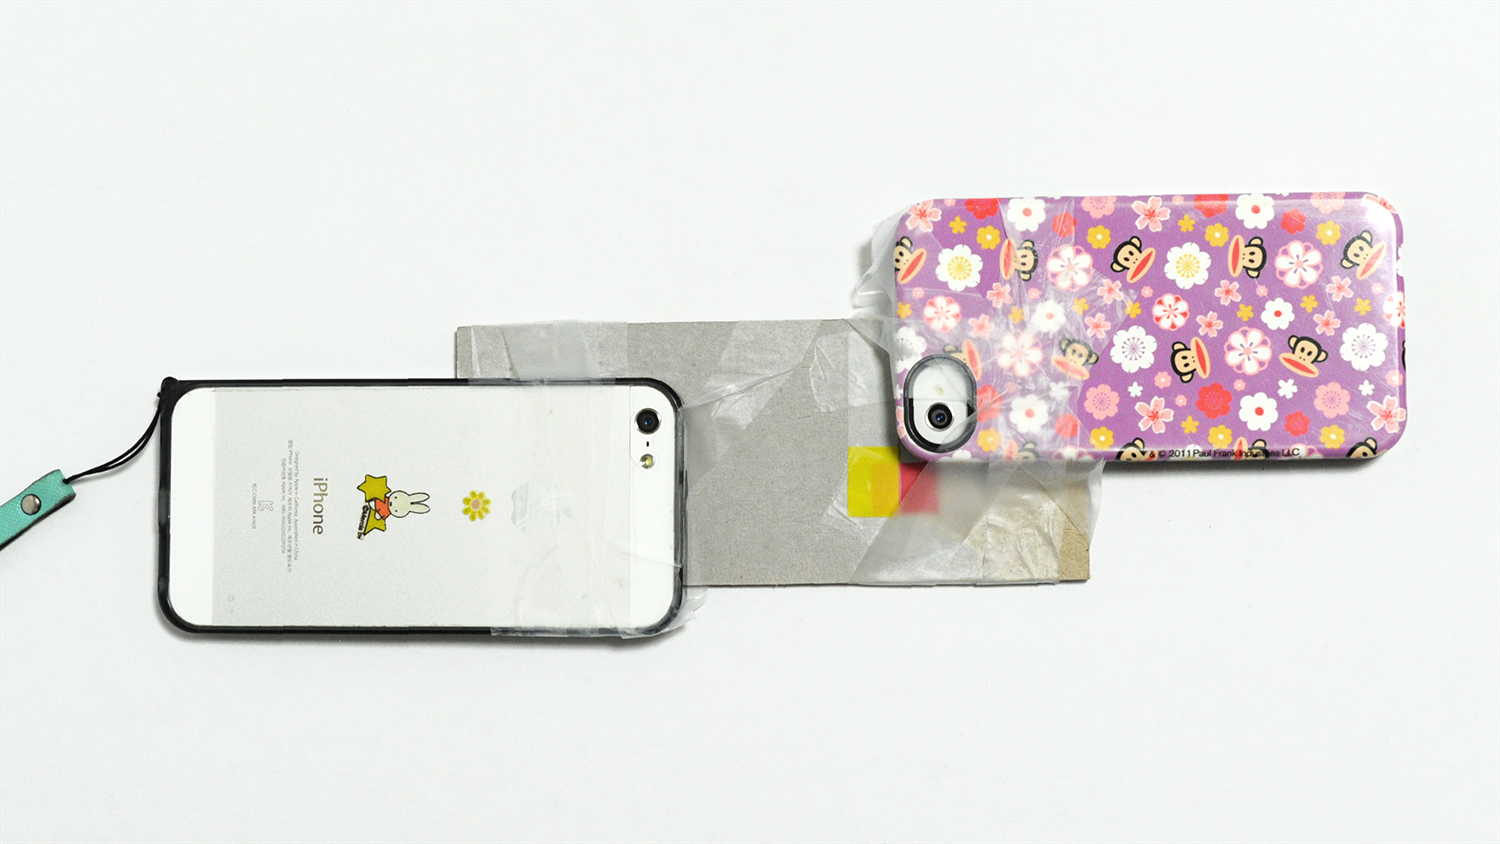
Before making an interactive system with kinect, I made a video using 2 iphones.
(distance between iphone cameras = 65mm)

키넥트로 실시간으로 작동되는 인터랙티브 시스템을 만들기 전에, 2대의 아이폰을 사용하여 영상을 제작하였다. (아이폰 카메라 간격 = 65mm)


1st attempt - iphone 4s + 5 - 20131015

At this attempt, a video was shot in horizontal orientation. But I couldn't get a good anaglyph video because iphones weren't fixed together tightly.

처음에는 아이폰을 가로로 두고 영상을 촬영했지만, 제대로 고정시키지 않은 탓인지 균등한 움직임이 나타나지 않아서 애너글리프 영상을 만들었을 때 좋은 효과를 보지 못했다.

screen capture in after effects - 20131015

anaglyph test mov with 2 iphones - 001 - 20131015

-----------------------------------------------------------------------------------------------------------
2 ^
-----------------------------------------------------------------------------------------------------------

At the second attempt, I bound 2 iphones in vertical orientation to fix them more tightly. (distance between iphone cameras = 65mm)

2번째 시도에서는 아이폰을 좀 더 단단히 고정시키기 위해 세로로 배열했다.
(아이폰 카메라 간격 = 65mm)


2nd attempt - iphone 4s + 5 - 20131015

I had thought each video would have almost equal tracking points from an auto tracking tool of Syntheyes, but actually, I got totally different tracking points and it occurred many errors.

실험을 하기 전에는 Syntheyes 프로그램에서 자동 트래킹 기능을 실행했을 때 두 개의 영상에서 거의 동일한 대상에서 트래킹 포인트가 추출될 것이라고 예상했지만, 실제로는 전혀 다른 대상에서 포인트가 추출되었고 오류도 많이 발생하였다.


screen captures in syntheyes - left / right - 20131015


screen captures in photoshop - 20131015


screen captures in after effects - 20131016

anaglyph test mov with 2 iphones - 002A - 20131016

anaglyph test mov with 2 iphones - 002B - 20131016

Red and cyan colors are in common use for anaglyph 3d images, and we can feel a 3 dimensional effect. But in this case, these colors generated something weird through different points from Syntheyes. If we can see both sides of a thaumatrope at once beyond the dimension, we can experience a quite similar feeling to this video.

And I think these kinds of differences with red and cyan colors can exceed the dimensional limits.

본래 애너글리프는 적청 안경을 통한 색상 차이로 입체감을 느낄 수 있도록 하는 것이지만, Syntheyes의 자동 트래킹 기능에서 발생한 미묘한 차이가 입체감을 넘어 또 다른 무언가를 생성하였다. 만약 차원을 넘어 더마트로프의 양쪽 면을 동시에 볼 수 있다면, 이런 느낌일 것이라고 생각한다.

그리고 다음 번에는 마지막 영상에서처럼 양쪽 눈에서 받아들이는 이미지에 차이를 두어, 기존 차원의 한계를 뛰어넘을 수 있는 가능성에 대해 연구를 진행해봐야겠다.


1008 - RCBW

From my another work in Game art class (link - game art blog), I thought about a border between virtual and real, computer and human. In my opinion, a future society will be constructed by this border through recontextual vision and color, because there are various color systems such as RGB, HSB, and CMYK.

I made a video below for demonstrating the thing among these color systems.

게임아트 수업 (link - game art blog)을 진행하면서 가상과 현실, 컴퓨터와 인간의 경계에 대해서 생각했었다. 나는 이 경계가 재구성된 시각과 색상의 표현 방식을 통해서 새로운 가능성이 나타날 것이라고 생각했는데, 인간이 인지할 수 있는 색상을 표현하기 위해 컴퓨터가 RGB, HSB, CMYK처럼 다양한 색상 표현 방식을 사용하고 있기 때문이다.

이 두 가지 방식 사이에 어떤 색상 표현 방식이 존재하고, 어떤 식으로 표현될 지 생각하면서 다음의 영상을 만들었다.

RCBW - anaglyph mov about vvvv depth and hierarchy - 20131007

screen capture in maya - 20131007

As I mentioned before, there is an invisible depth which human can't see in a flat screen, but cyan and red colors from an anaglyph method make that human can feel this depth.

Next time, I want to make 2 types of works. One is a virtual graphic which can be felt real such as anaglyph graphics, and the other is a real object which can be felt virtual. This can demonstrate the relationship (human wants to be computer, computer wants to be human) between human and computer of the present.

이전에 언급했듯이, 평면의 컴퓨터 스크린에는 인간의 눈에는 보이지 않는 깊이가 존재한다고 생각한다. 그리고 애너글리프 방식에 쓰이는 적청 색상은 인간이 인지할 수 없었던 깊이감을 보고 느낄 수 있도록 한다.

이후에 이러한 가상의 형태는 현실감을, 그리고 현실에 존재하는 형태는 마치 가상의 물체처럼 느껴질 수 있도록 발전하려고 한다. 이것은 인간은 컴퓨터를 닮아가는 반면, 컴퓨터는 점차 인간처럼 발전해가는 현대 사회의 모습을 나타낼 수 있을 것이다.

-----------------------------------------------------------------------------------------------------------

Also I did some experiments how to use cyan and red colors in different ways.


screen captures in maya - 20131008


2013
main / network / new post / posts / pages / template / customize / layout
hleefactory@gmail.com
THESIS BLOG >


Human and Computer ;
The Visible and The Invisible

-
Hayoun Lee

-
Supervisor
Prof. David Hall


논문 블로그 >


인간과 컴퓨터 ;
보이는 것과 보이지 않는 것

-
이하연

-
지도교수
데이빗 홀 교수님


100
536
180